Wednesday 30 January 2008

Creating A Pie Chart Using Free Web Charting Control For ASP.NET

Pretty cool, and free, charting control for ASP.NET applications from Carlos Ag Download it here

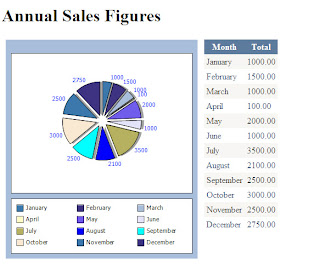
Here's an example of a pie chart with source code:

  1. Create a New Website Project in Visual Web Developer Express
  2. Create a Bin folder and add a reference to WebChart.dll
  3. Create a Database Table in your Database , I used Microsoft SQL Server Management Studio Express, called Sales with the columns id, Month and Total. Then add some dummy data to your table.
  4. In Visual Web Developer Express create a DataSet using the DataSet Designer to retreive your data.
  5. In Visual Web Developer Express create a class called Sales containing one method to return a DataTable containing your test data.
  6. Create an aspx file , I called mine SalesChart.aspx
  7. In your aspx file register the WebChart control like this :
    <%@ register tagprefix="web" namespace="WebChart" assembly="WebChart"%>
  8. Add a GridView control, I called mine gvSales.
  9. Add a WebChart control like this:
  10. In the code behind file Import the correct namespaces and add code to bind the data to the controls.
  11. Run your project.
Source Code:

SalesChart.aspx

<%@ Page Language="VB" AutoEventWireup="false" CodeFile="SalesChart.aspx.vb" Inherits="SalesChart" %>
<%@ register tagprefix="web" namespace="WebChart" assembly="WebChart"%>
<!DOCTYPE html PUBLIC "-//W3C//DTD XHTML 1.0 Transitional//EN" "http://www.w3.org/TR/xhtml1/DTD/xhtml1-transitional.dtd">
<html xmlns="http://www.w3.org/1999/xhtml" >
<head runat="server">
<title>Sales Chart</title>
</head>
<body>
<form id="form1" runat="server">
<div>
<h1>Annual Sales Figures</h1>
<table cellpadding="5">
<tr>
<td style="height: 402px" valign="top"><web:chartcontrol runat="server" id="ChartControl1" height="400" width="350" gridlines="none" legend-position="Bottom" /></td>
<td style="width: 204px; height: 402px" valign="top">
<asp:GridView ID="gvSales" runat="server" CellPadding="4" ForeColor="#333333" GridLines="None" AutoGenerateColumns="false" >
<FooterStyle BackColor="#5D7B9D" Font-Bold="True" ForeColor="White" />
<RowStyle BackColor="#F7F6F3" ForeColor="#333333" />
<EditRowStyle BackColor="#999999" />
<SelectedRowStyle BackColor="#E2DED6" Font-Bold="True" ForeColor="#333333" />
<PagerStyle BackColor="#284775" ForeColor="White" HorizontalAlign="Center" />
<HeaderStyle BackColor="#5D7B9D" Font-Bold="True" ForeColor="White" />
<AlternatingRowStyle BackColor="White" ForeColor="#284775" />
<Columns>
<asp:BoundField DataField="Month" HeaderText="Month" />
<asp:BoundField DataField="Total" HeaderText="Total" />
</Columns>

</asp:GridView></td>
</tr>
</table>
</div>
</form>
</body>
</html>


SalesChart.aspx.vb

Imports System.Data
Imports System.Data.SqlClient
Imports WebChart

Partial Class SalesChart
Inherits System.Web.UI.Page

Protected Sub Page_Load(ByVal sender As Object, ByVal e As System.EventArgs) Handles Me.Load
If Not Page.IsPostBack Then
CreateChart()
BindGrid()
End If
End Sub

Sub BindGrid()
Dim s As New Sales
Me.gvSales.DataSource = s.GetSalesFigures
Me.gvSales.DataBind()
End Sub

Sub CreateChart()
Dim chart As PieChart = New PieChart
Dim s As New Sales
chart.DataSource = s.GetSalesFigures
chart.DataXValueField = "Month"
chart.DataYValueField = "Total"
chart.DataLabels.Visible = True
chart.DataLabels.ForeColor = System.Drawing.Color.Blue
chart.Shadow.Visible = True
chart.DataBind()
chart.Explosion = 10
ChartControl1.Charts.Add(chart)
ChartControl1.RedrawChart()
End Sub

End Class
Here's the Sales class:

Imports Microsoft.VisualBasic
Imports System.Data


Public Class Sales

Public Function GetSalesFigures() As DataTable
Dim dt As New DataTable
Dim sta As New dsSalesTableAdapters.SalesTableAdapter
dt = sta.GetSales
Return dt
End Function

End Class

And last but not least, here's a screen-shot of what you should end up with:


Credit Card Payment Processing

Cool article here
on handling credit card payment processing in ASP.NET applications.

Tuesday 29 January 2008

Paypal Integration Guide

Get PayPal Integration Guide here

CSS Conditional Comments

Excellent article on conditionally applying stylesheets without messing about with JavaScript browser sniffers.

IE CSS Conditional Comments

Monday 21 January 2008

Adding Meta Tags Programmatically

Here's how to add keywords, description, title to an aspx page in the code behind.

Dim h As HtmlHead = DirectCast(Me.Page.Header, HtmlHead)
Dim author As New HtmlMeta
author.Name = "author"
author.Content = "title of website"
Dim d As New HtmlMeta
d.Name = "description"
d.Content = "I am page description"
Dim t As New HtmlMeta
t.Name = "title"
t.Content = "I am page title"

Dim k As New HtmlMeta
k.Name = "keywords"
k.Content = "I am kewords list, etc, etc"
h.Controls.Add(author)
h.Controls.Add(d)
h.Controls.Add(t)
h.Controls.Add(k)

Compiling Code Using The SDK Command Prompt

If like me you have the free version of Visual Studio, i.e. Visual Web Developer Express 2005, and you have had the same drama trying to find the Publish Website Option, which basically doesn't exist, not in my version anyway, you will have to use the Command Prompt Tool in the .NET Framework SDK to compile your source code.

Here's an example:

C:\Program Files\Microsoft.NET\SDK\v2.0>aspnet_compiler -v myWebsite -p C:\Inetpub\wwwroot\myWebsite c:\myWebsite

Type aspnet_compiler -? at the command prompt to see what the switches mean.

3 Column CSS Layout

As I'm forever having to look up how to do 3 column CSS layouts with a fixed footer I'm publishing the code here:

<?xml version="1.0" encoding="iso-8859-1"?>
<!DOCTYPE html PUBLIC "-//W3C//DTD XHTML 1.0 Strict//EN" "http://www.w3.org/TR/xhtml1/DTD/xhtml1-strict.dtd">
<html xmlns="http://www.w3.org/1999/xhtml" xml:lang="en-US" lang="en-US">
<head>
<title>3 Colum Layout Template with Fixed Footer</title>
<meta http-equiv="content-type" content="text/html; charset=iso-8859-1" />


<style type="text/css">
html
{
height: 100%;
}

body
{
height: 100%;
text-align:center;
}

#nonFooter
{
position: relative;
min-height: 100%;
text-align:left;
width:680px;
margin:5px auto;
}

* html #nonFooter
{
height: 100%;
}

#footer
{
position: relative;
margin-top: -7.5em;
clear:both;
}

#nav{width:120px; float:left;padding:5px;margin:5px;}
#content{float:left;width:400px;margin:5px;padding:5px;}
#right{float:left;width:100px;margin-left:10px;padding:5px;}


</style>

</head>
<body>
<div id="nonFooter">

<div id="nav">
<ul>
<li><a href="#">bla</a></li>
</ul>
</div>

<div id="content">
<h1>3 Colum Layout Template with Fixed Footer</h1>

<p>Lorem ipsum dolor sit amet, consectetuer adipiscing elit. Maecenas nec justo sed lectus porta
cursus. Aliquam ut sapien. Ut diam. Pellentesque quis ipsum. Aliquam erat volutpat. Nullam nisl eros,
volutpat non, aliquet tempus, tincidunt ut, diam. Vivamus lorem velit, ornare in, malesuada et, porttitor
ac, diam. Vestibulum ante ipsum primis in faucibus orci luctus et ultrices posuere cubilia Curae; Fusce eu
nisl eget felis gravida congue. Nulla ipsum massa, fermentum et, interdum in, euismod sit amet, augue.
Quisque pellentesque nisi quis nulla. Donec augue augue, congue id, gravida viverra, dictum in, quam. Nam
aliquam. Praesent quam nisi, commodo eu, auctor eget, suscipit quis, dui. Duis fermentum rutrum ante.
Pellentesque sollicitudin, tortor non consectetuer sollicitudin, purus velit ornare leo, facilisis porta
leo libero vitae sem. Cras ac mauris. Nulla facilisi.</p>
</div>
<div id="right">
<p>Google Bla</p>
<p>Google Bla</p>
<p>Google Bla</p>
</div>
</div>
<div id="footer">
© bla 2007
</div>
</body>

</html>

Friday 18 January 2008

Sending Email

Here's a quick rundown on how to send an email from your aspx page.

In the code behind call the namespace:

Imports System.Net.Mail

The OnClick event for your Send button could look something like this:

Dim msgBody As String
msgBody = "THE BODY OF YOUR MESSAGE GOES HERE"

Dim msg As New MailMessage
msg.From = New MailAddress("fromthisguy@whatever.com")
msg.To.Add(New MailAddress("tothisguy@thisguyswebsite.com")
msg.Subject = "SUBJECT FOR MESSAGE GOES HERE"
msg.Body = msgBody
Dim mc As New SmtpClient
mc.Send(msg)

Last but not least you also need to set the smtp settings for the web application in the web.config file, the quickest way to do this is using the
Web Site Administration Tool , here's an example of web.config settings anyway:


<system.net>
<mailSettings>
<smtp from="info@wrapturegifts.co.uk">
<network host="YOUR MAILSERVER ADDRESS HERE" password="YOUR SMTP EMAIL PASSWORD HERE" userName="YOUR SMTP USERNAME HERE" />
</smtp>
</mailSettings>
</system.net>

Uploading Images and Creating Thumbnails

Import these NameSpaces in the code behind:

Imports System.io
Imports System.Web
Imports System.Drawing
Imports System.Drawing.Imaging

Let's say you have a FileUpload control called upImage and a Button called btnUpload on your aspx page. The subroutine for btnUpload would look like this:

Protected Sub btnUpload_Click(ByVal sender As Object, ByVal e As System.EventArgs) _ Handles btnUpdateProduct.Click

'upload image file
Dim savePath As String
savePath = Server.MapPath("/uploads/")
If Me.upImage.HasFile Then
Dim fileName As String
fileName = upImage.FileName

'***************************************
' remove spaces and non alphanumeric
'characters from image names
'***************************************
fileName = fileName.Replace(" ", "")
fileName = fileName.Replace("(", "")
fileName = fileName.Replace(")", "")
fileName = fileName.ToLower

savePath += fileName
upImage.SaveAs(savePath)


'****************************************************************
' resize and thumbnail uploaded image
'****************************************************************

Dim fullSizeImg As System.Drawing.Image
fullSizeImg = System.Drawing.Image.FromFile(Server.MapPath("/uploads/" & fileName))

'Duplicate image to reasonable size
Dim h As Integer
h = fullSizeImg.Height
Dim w As Integer
w = fullSizeImg.Width
Dim nh As Integer
nh = h * 300 / w
Dim thumbNailImg1 As System.Drawing.Image
thumbNailImg1 = fullSizeImg.GetThumbnailImage(300, nh, dummyCallBack, IntPtr.Zero)

Dim nProdImg As String
nProdImg = "img" & fileName
thumbNailImg1.Save(Server.MapPath("/talkisgreen/img/phones/thumbs/" & nProdImg))
'Delete original file
TidyFile(fileName)
End Sub


Sub TidyFile(ByVal fileName As String)
Dim path As String
path = Server.MapPath("/uploads/")
Try
' Delete the newly created file.
File.Delete(path & fileName)
Catch e As Exception

End Try

End Sub


GridView Delete Button Adding Client-Side Confirmation

Let's say you have a GridView control containing a CommandField with the ShowDeleteButton attribute set to true like so:

<asp:CommandField ShowDeleteButton="True" />

When the user clicks on one of these delete buttons in the GridView the record is deleted so no problem right? WRONG! What happens if they clicked on the wrong button? There's no way currently of preventing that from happening.

So we add a Client-Side confirmation box asking the user to confirm the delete operation using the GridViews' RowDataBound event.


Protected Sub gv_RowDataBound(ByVal sender As Object, ByVal e As System.Web.UI.WebControls.GridViewRowEventArgs) Handles gvPending.RowDataBound

If e.Row.RowType = DataControlRowType.DataRow Then
Dim db As LinkButton = CType(e.Row.Cells(1).Controls(0), LinkButton)
db.OnClientClick = String.Format("return confirm('Please confirm you wish to delete this record ?');")
End If

End Sub

File Upload

Add a fileupload control and a button to the .aspx page:

<asp:FileUpload ID="FileUpload1" runat="server" Height="20px" />
<asp:Button ID="btnUpload" runat="server" Text="LINK" Height="20px" />

Let's say we're uploading our files to a folder called "UPLOADS" the OnClick event for btnUpload would look like this:

Protected Sub btnUpload_Click(ByVal sender As Object, ByVal e As System.EventArgs) Handles btnLinkPOD.Click

Dim savePath As String
savePath = Server.MapPath("UPLOADS/")

If Me.FileUpload1.HasFile Then
fileName = Me.FileUpload1.FileName
savePath += fileName
Me.FileUpload1.SaveAs(savePath)
End If

End Sub

Retreiving Username of Person Logged In

This is very straightforward.

Dim username as string
username = Me.Page.User.Identity.Name

Adding Total Columns to GridView Footer

Here's an example of how to add a total to a GridViews' footer. Let's say we have a function which gives the total value of sales of a given product, which receives a single paramater of productID.


Protected Sub gv_RowDataBound(ByVal sender As Object, ByVal e As _ System.Web.UI.WebControls.GridViewRowEventArgs) Handles gv.RowDataBound

If e.Row.RowType = DataControlRowType.DataRow Then

ElseIf e.Row.RowType = DataControlRowType.Footer Then

e.Row.Cells(2).Text = "TOTAL : "
e.Row.Cells(3).Text = GetTotal(request.querystring("productID"))

End If

End Sub

Thursday 17 January 2008

Crystal Reports - PUSH Method Example

Whether you want to or not as a professional developer at some point you are going to have to bang out some Crystal Reports, after a few false-starts I managed to get my head around the basics. Here's an example of producing a Crystal Report using the PUSH method.

ASPX PAGE:

Add the following just below the Page Directive declarations:

<%@ Register Assembly="CrystalDecisions.Web, Version=10.2.3600.0, Culture=neutral, PublicKeyToken=692fbea5521e1304"
Namespace="CrystalDecisions.Web" TagPrefix="CR" %>

Add a CrystalReportViewer control to the form:

<CR:CrystalReportViewer ID="crv" runat="server" AutoDataBind="true" />


CODE BEHIND:

Imports System.Data
Imports System.Data.SqlClient
Imports CrystalDecisions.CrystalReports.Engine

Protected Sub Page_Init(ByVal sender As Object, ByVal e As System.EventArgs) Handles Me.Init

' SET UP THE DOCUMENT OBJECT
Dim doc As CrystalDecisions.CrystalReports.Engine.ReportDocument
doc = New CrystalDecisions.CrystalReports.Engine.ReportDocument
doc.Load(Server.MapPath("MyReport.rpt"))
doc.SetDatabaseLogon("username", "password")

' RETRIEVE DATA USING TABLE ADAPTERS FROM THE STRONGLY TYPED DATASET 'YOU HAVE DESIGNED IN THE DATASET DESIGNER
Dim myTable as DataTable = myDataAdapter.GetRecords

'ADD THE DATATABLE TO THE DOCUMENT OBJECTS
'DATABASE.TABLES COLLECTION AND SET THIS
'AS THE DATASOURCE
doc.Database.Tables("myTable ").SetDataSource(myTable )
Me.crv.ReportSource = doc
'BIND THE DATA TO THE REPORTVIEWER
crv.DataBind()

End Sub

NB . When deploying anything with Crystal Reports in it you need to make sure that
the Crystal Reports Engine is installed on the server. If it isn't you will need this file:

CRRedist2005_x86.msi aka The Crystal Reports BootStrapper.

It might sound obvious but you also need to make sure that there is a PDF reader installed on the server as well.


Adding NULL values to SQL DateTime Columns

During a recent project I found that leaving a date parameter as NULL triggered an exception during the SQL Insert and Updates of my Data Access Layer routines. After some digging I found that apparently an empty string is not treated as Nothing by SQL. It actually interprets "" as 1/1/1900. So you have to specifically pass an sqldatenull value.

Here's an example to illustrate:

Let's say you have a calendar control on your aspx page where users have the option to select a date. While adding the parameters to the sqlcommand parameters collection you simply add a conditional statement which checks for a null value , i.e. whether the user selected a date on the calendar.

Imports System.Data
Imports System.Data.SqlClient
Imports System.Data.SqlTypes

If (
me.Calendar1.selecteddate = nothing ) Then
cmd.Parameters("@Date").Value = sqldatenull
Else
cmd.Parameters("@Date").Value = me.Calendar1.selecteddate
End If

Update. The above code won't work without the declaration. However the example below works as I've just used it this minute:

If theDate = Nothing Then
'declare sqldatenull as SqlDateTime value with the value NULL
Dim sqldatenull As SqlDateTime
sqldatenull = SqlDateTime.Null
cmd.Parameters.AddWithValue("@theDate", sqldatenull)
Else
cmd.Parameters.AddWithValue("@theDate", theDate)
End If


Using DatePart to Retreive the Week Number of a Date

While working on a project recently we had to generate reference numbers which included the week number of a given date. After tearing what's left of my hair out, and believe me there isn't much left, I asked a friend who pointed me in the direction of the DatePart function in VB.NET. This is an absolute life-saver.

Example:

Dim d As Date
d = Date.Today
Dim WeekNumber As Integer = vb.DatePart(DateInterval.WeekOfYear, d)

This assigns the week number for todays' date to the
WeekNumber variable.

Triggering A Postback from A Popup Window

Adding this Javascript to the Child Page i.e. popup , will postback to the Parent:


<script type="text/javascript">

window.opener.document.forms[0].submit();


</script>

More Access Database Stuff

An Alternative for Server.Mappath


Request.PhysicalApplicationPath + "App_Data\\edc_reg.mdb"

Access Database Stuff

Access Database Connection String for .NET – place in the web.config file:

<connectionStrings>
<add name="ConnectionString" connectionString="Provider=Microsoft.Jet.OLEDB.4.0;Data Source=|DataDirectory|\databasename.mdb" providerName="System.Data.OleDb" />
</connectionStrings>

SQL Wildcard Search Example

I'm forever forgetting how to do these so am posting an example here.


"SELECT * FROM myTable WHERE myTable.FieldName LIKE '%' + '" & Trim(myString) & "' + '%'"


Disabling the Enter Button to avoid triggering clientside code

While working on a recent project the users found that when they hit the enter key a client-side confirmation box kept being triggered for Logging Out.

A simple way to avoid this is to set the forms default button property to whichever control you want the Enter button to be connected to.

Eg.

<form id="form1" runat="server" defaultbutton="myButton">

You can also do this with Panel controls.

Adding Properties to a Pages' ViewState

A good friend of mine gave me a heads-up on this one. Remembering that each page you create is a class you can add properties to it and hold them in ViewState.

Private _PageProp As Integer

Public Property PageProp() As Integer


Get

Return ViewState(_PageProp)
End Get
Set(ByVal value As Integer)
ViewState(_PageProp) = value
End Set

End Property

e.g.
Me.PageProp = 1

Adding JavaScript Code in Code Behind

Adds Client-side Confirmation Button to a Button Control

Protected Sub Page_Load(ByVal sender As Object, ByVal e As System.EventArgs) Handles Me.Load

If Not IsPostBack Then
Me.Button1.Attributes.Add("onclick", "return confirm('Are you sure?');")
End If
End Sub

Adds Pop Up Window to Button Control


Protected Sub Button1_Click(ByVal sender As Object, ByVal e As System.EventArgs) _
Handles Button1.Click


Dim popupScript As String = ""

ClientScript.RegisterStartupScript(GetType(String), "PopupScript", popupScript)

End Sub